The mapping of 301 redirects is an essential albeit often time-consuming SEO task. If you fail to compile and deploy a comprehensive redirect map during a site migration, then the results can be nothing short of catastrophic from an organic traffic / visibility perspective.
Working with large enterprise clients, it’s not uncommon for such websites to features tens of thousands of pages. Such page counts can often be further inflated if an organisation operates internationally across numerous territories and provides content in multiple languages.
In this post I’m going to detail how using Microsoft’s Fuzzy Lookup add-in for Excel could save you significant time (and your sanity) when compiling large redirect maps.
What is a fuzzy lookup
Firstly, what is Microsoft’s Fuzzy Look-Up add-in? The add-in was developed by Microsoft Research to allow the ‘fuzzy’ matching of textual data. It can be utilised to identify fuzzy matching rows both within a single table or to fuzzy join rows across two different tables within Excel. Where fuzzy lookup differs from a standard vlookup, hlookup or index match type formula is its ability to more robustly match rows in the presence of spelling mistakes, abbreviations, synonyms and added / missing data. A further benefit is the ability for the add-in to generate a similarity score allowing for a confidence level to be factored in.
Before we get started, click here to download Microsoft’s Fuzzy Lookup Excel Plugin.
Step 1 – Compile website crawls
Once you have completed installation of the Fuzzy Lookup add-in for Excel, the first task which you must complete is to perform a crawl of both the live (legacy) website and the staging (new) website.
Choosing a crawl tool
To perform this task, you can utilise a host of site crawling tools including: Screaming Frog, DeepCrawl, Moz, Ahrefs. Each tool has their own respective benefits, but my personal preference would be either Screaming Frog or DeepCrawl. The key determining factor for which tool to use is likely to be primarily driven by the size of your site. Screaming Frog is a powerful offline crawl tool which you install on your own machine. It’s performance and ultimately the total number of URLs it can crawl is very much dependent on the spec of your machine. In contrast DeepCrawl is a cloud-based crawl tool which in theory has no limit on the number of URLs it can crawl. In order to utilise Screaming Frog on large enterprise sites then it is best to install it on a dedicated server. The cost of setting up such an environment is likely to outweigh the savings of the initial subscription fee.
From a cost perspective both tools in my opinion offer fantastic value for the functionality they provide. Screaming Frog offers a free version which can be run on sites <500 URLs, with an annual cost of £149 for the unlimited version. In comparison DeepCrawl starts at a monthly cost of £63 per month allowing you to crawl up to 100,000 URLs across 5 separate projects.
In summary if your website features 10,000 URLs or less then Screaming Frog is likely to be your best option, however if you have a website which exceeds this figure then DeepCrawl is likely to be the more cost-effective option in the long run.
Crawl prerequisites
Prior to running a crawl of both the current live website and new staging website, it is crucial to ensure:
- No future content updates are planned to be added to the current live website ahead of the new site launch. If any new pages are added after the crawl has been completed, then it is likely this content will be missed form the redirect map.
- All pages must have been created and ideally populated with content on the new staging website, specifically the following elements: URL, page title and H1(s)
Step 2 – Format data
Once separate crawls have been captured / exported for both the current live website and new staging website, the next step is to remove all unnecessary data. Optimally only the following information is required:
- URL
- Page title
- H1
Legacy crawl
The screenshot below illustrates a sample selection of URLs / content which will act as our current live site:

Staging crawl
This second screenshot illustrates a sample selection of URLs / content captured from our proposed new staging website:

Notice the updated URLs, optimised page titles and refined H1 content.
Once all unnecessary data has been deleted from each respective crawl, copy and paste each crawl into a single document but on to separate tabs – ‘Source’ and ‘Destination’. Additionally, create a third empty tab and name it ‘Redirect Map’. It is this tab where we will compile the final output.

Next format the data from both crawls as a table within their respective tabs. Each table should be given a logical name to ensure they can be easily differentiated when utilising the fuzzy lookup function. ‘liveSite’ and ‘stagingSite’ are the respective table names I will utilise for the purposes of this tutorial. For reference table names must be absent of spaces, so I utilise camel case naming conventions to aid readability.

Step 3 – Perform Fuzzy Lookup(s)
Once you have compiled all crawl data the next step is to begin the actual redirect mapping activity. To begin, open the Fuzzy Lookup sidebar by clicking the Fuzzy Lookup option within Excel’s ribbon.

Create table join
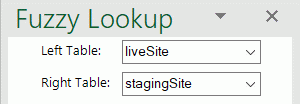
The first step to performing a fuzzy lookup is to create a join (relationship) between your live website crawl (Left Table) and new staging website crawl (Right Table). In the ‘Left Table’ drop down menu select the table named ‘liveSite’ and in the ‘Right Table’ drop down menu select the table named StagingSite’.
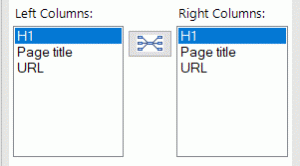
Once both tables have been selected, you must now define which columns should be specifically matched within the fuzzy lookup function. Columns are selected by choosing the respective column headers from the drop-down list and then clicking the connect button. Note it may be necessary to delete existing predefined auto-generated column relationships from the ‘Match Columns’ list.
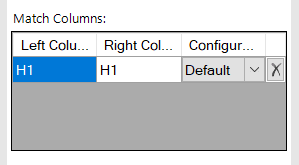
Dependent on your actual data is likely to influence which columns you utilise within your fuzzy lookup function(s). I typically begin by trying the H1. H1s tend to feature the most refined / optimally matchable data. However no two sites are the same so the key here is trial and error until you achieve the optimum result:
Select output columns
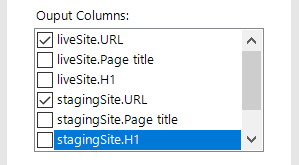
In order to produce a redirect map requires a source URL and a destination URL. As such for the output columns select: ‘liveSite.URL’ and ‘stagingSite.URL’.
Additionally select to output the following column ‘FuzzyLookup.Similarity’ (more on this later).
Define number of matches
Next define the number of matches to return per input row. The value should be left unchanged as ‘1’:

Similarity threshold
The similarity threshold allows you to adjust the sensitivity of the fuzzy matching. Typically I would recommend starting in the default position of ‘0.5’ and then adjusting up and down accordingly. Helpfully included within the sidebar is an undo button which you can quickly press to reset the output each time a new configuration is trialed:

Go
The final step prior to hitting ‘Go’ is to place your cursor where you wish the output to be inserted. For the purposes of this tutorial select cel A1 on the ‘Redirect Map’ tab which you previously created.
Step 4 – The Output
The screenshots below illustrate the respective outputs from matching each of the different columns. Notice the varying similarity scores across each column:
H1 match

Page title match

URL match

Step 5 – Manual Checks
Additional Steps (Performance Enhancements)
While the implementation of redirects is essential to help maintain organic visibility / promote optimum usability, it is also important to carefully consider the respective performance implications. Redirect rules have a direct impact on page speed due to the requirement for a server to check all redirect rules prior to loading a web page. The greater the number of redirects, the more time will be required to parse all respective redirect rules. For this reason it is crucial to rationalise any redirect list prior to uploading in order to ensure it does not contain potential bloat.
In order to help rationalise your redirect map I would strongly recommended both analytics data and authority data is also factored into your redirect map creation methodology. Analytics data should be utilised to exclude pages which have received low entrances or page views. Common sources include: Google Analytics, Adobe Analytics Cloud etc. Similarly authority data should be utilised to help prioritise the inclusion of redirects based on perceived levels of authority held by a page. In order to help identify such levels of authority I would recommend factoring a metric such as Moz’s Page Authority (PA).
Finally in addition to rationalising your redirect map, further potential performance gains can be achieved through the utilisation of pattern matching rules implemented via regular expressions, commonly referred to as regex. A regular expression is a string that describes or matches a set of strings. In the case of redirects, a single regular expression can be utilised to match a set of pages which match a defined criteria. This can enable the number of rules contained within a redirect map to be significantly reduced enabling a server to process it in a reduced amount of time, promoting fast page load times.
You won’t believe how much manual Excel labor you’ve just saved me for a massive last minute migration. I will be forever thankful
I can relate, it was a similar situation that led me to discovering this approach. Anything that reduces time spent mapping redirects page by page is definitely a good thing!